Create an Estimate
Overview
The Buildwise Estimate Builder allows you to create a new estimate from scratch or copy an existing estimate from another project. After you create your estimate, you will Add Costs.
Notes
- While you can create multiple estimates for a project, you can only have one approved estimate.
- You can also update an estimate at any time while it is in Draft status.
In this article, we’ll cover how to build a new estimate or copy an existing estimate from another project.
Create a New Estimate
There are three ways to initiate the process of creating a new estimate, either from the project dashboard or the buttons on the left sidebar.
|
1 |
2 |
3 |
| Within a project dashboard > Estimates > + Create Estimate |
Left sidebar > Create New button > Estimate |
Left sidebar > Estimates button > + Create Estimate |
|
|
|
|


The Add New Estimate popup opens. Note: The popup has an additional field if you create an estimate from the left sidebar.
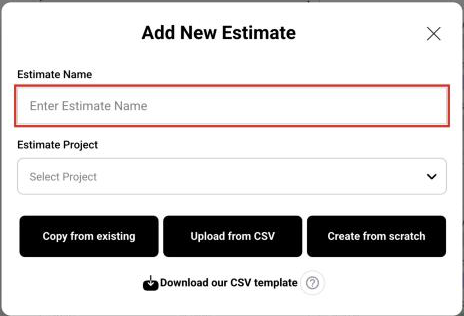
Enter the Estimate Name. Example: [Address] - v1.0
Click Create from scratch. The project Estimate Builder displays in Draft status.
Note: To copy an existing estimate, click Copy from existing and refer to the Copy an Existing Estimate section below.

When the estimate is created for the project, the next step is to add Cost Groups and their associated Cost Sections (optional) and Cost Items.
Copy an Existing Estimate
Copying an existing estimate is especially helpful when creating new estimate projects similar to ones you’ve already done or when revising an existing estimate for a client.
Notes
- You must have at least one estimate already in the system to use this functionality.
- When you copy an estimate from another project, the cost groups, cost sections, and cost items will all appear in the destination estimate. All of the project markups will be updated to the destination projects markup settings in Project Overview. For more on how to set markups in the Project Overview, refer to the article Set Up Markup Costs.
- The copy also brings over the text on the Share tab (Document Title, Project Description, Project Goals, Inclusions, Exclusions, Terms And Conditions and Next Steps), the Internal Notes, the Pricing choice and the tax setting. A few things are not copied: attached PDF files, files on lines and the Allowances choice (it goes back to With Mark-up). The cover photo is only copied when you copy within the same project.
- You can copy a fixed cost estimate into a cost-plus project and vice versa. When you do, the Pricing choice on the Share tab switches to the default for the new contract type: Lump Sum for Fixed Cost, Cost Item Total for Cost Plus.
In the Add New Estimate popup, click Copy from existing.
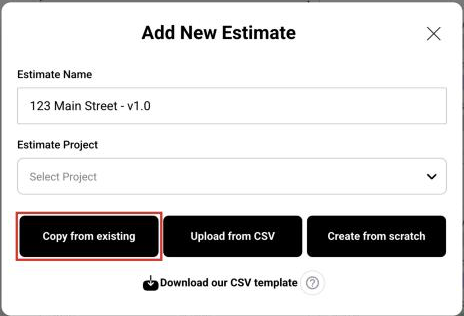
The Create Estimate From popup opens.
Enter the Estimate Name. Example: We recommend using a conventional naming system such as [Address] - v1.0.

In the Source Project dropdown, select the project where the estimate you want to copy is saved.
Note: The list of projects includes Active and Inactive projects.

In the Source Estimate dropdown, select the estimate you want to copy.

Click Create. The project Estimate Builder displays the copied estimate in Draft status.
Review the copied estimate and add or update costs as needed.

Copy an Estimate from the Estimates Dashboard
You can also click the copy icon on an estimate's card (or its row in list view) on the Estimates dashboard. In the Copy Estimate To Project popup, pick the project to copy it to. It can be the same project or a different one. The copy starts as a new Draft, and its name starts as the old name followed by __copy. You can rename it.
Upload an Estimate from a CSV File
You can build an estimate in a spreadsheet and upload it.
- In the Add New Estimate popup, enter the Estimate Name and pick the project.
- Click Download our CSV template. It has these columns: Cost Group, Cost Item, Description, COG, Quantity, Unit Type, Unit Cost, Cost, Markup Percentage and Total.
- Fill in one row for each line. Cost Group, Description and COG are required. Cost Group and Cost Item must match names already in your Buildwise account (upper or lower case does not matter). COG must be Labor, Materials or Trade Partners.
- Markup Percentage can be 0 to 100. If you leave it blank, the project's markup for that COG is used. You can leave Total blank; Buildwise works it out.
- If you leave Unit Cost blank but fill in Cost, Buildwise works out the Unit Cost from Cost and Quantity, rounded to the cent. As an example, a Cost of $100.00 with a Quantity of 3 gives a Unit Cost of $33.33, so the line cost is $99.99.
- Click Upload from CSV and pick your file. It must be a .csv file of 10 MB or less.
If any row has a problem, nothing is uploaded. An Upload Error popup lists each problem with its row number. Fix those rows and click Try again.
If you have any questions or need support:
💬 Click the beacon on this page to chat with us
📩 Click the beacon on this page to email us